How to install OpenVPN® on Raspberry Pi OS
Guide for VPN Unlimited users
Raspberry Pi is a credit-card sized computer that runs Linux and could be plugged into a PC monitor or TV. To protect your Raspberry Pi computer from any unauthorized access while browsing the internet, we recommend you to get started with a reliable open-source encryption technology named OpenVPN®. To get more information about the OpenVPN® protocol, check out this page.
Below you can find the guide that provides you with step-by-step instructions on how to install OpenVPN® on Raspberry Pi.
I. Get OpenVPN® manual configuration files
I. Get OpenVPN® manual configuration files
First of all, you need to generate VPN Unlimited manual configuration settings in your User Office. For this, follow a few simple steps outlined in the tutorial about how to manually create VPN configurations.
II. Configure OpenVPN® on Raspberry Pi OS
1. To make sure that the OpenVPN® client would perfectly work on your Raspberry Pi PC, you should update the system, packages, and repositories. To do this, launch the Terminal app and print the next commands:
apt-get update
apt-get upgrade
2. Then you should install the Network Manager and necessary OpenVPN® packages. For this, print the following command:
sudo apt install network-manager network-manager-gnome openvpn
openvpn-systemd-resolved network-manager-openvpn
network-manager-openvpn-gnome
3. Type Y and press Enter to confirm installation of the packages.
4. Click on the Network Connections icon and press VPN Connections > Add VPN Connection...

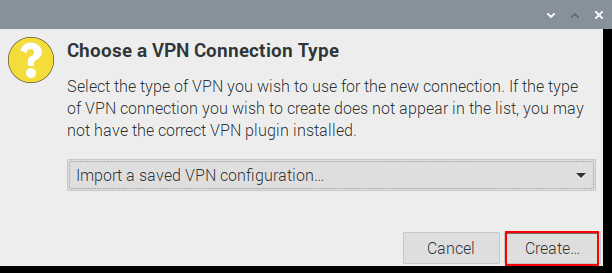
5. Select Import a saved VPN configuration... and press the Create... button.

6. Choose the OpenVPN® configuration file that was previously downloaded from your User Office and click Open.

7. Select Password with Certificates (TLS) in the Type field.
Enter the Login and Password from the Device Config section in your User Office. Press Save.

III. Manage OpenVPN® Raspberry Pi connection status
To turn on your VPN connection, press the Network Connections icon and select your newly created OpenVPN® connection.

To disable the OpenVPN® Raspberry Pi client, tap the Network Connections icon and press the Disconnect button.

That’s all for today! Need to configure VPN clients on other devices? Check out our Manuals page for the relevant guides. If you have any additional questions, feel free to contact our customer support via [email protected].
“OpenVPN” is a registered trademark of OpenVPN Inc.
Get VPN Unlimited right now
Select your perfect subscription plan and get additional 7 days for absolutely free! Don't forget about our unique VPN lifetime plan.