WireGuard VPN Configuration for MikroTik Router
for VPN Unlimited users
How to Install VPN Unlimited on Different Platforms & Create KeepSolid ID
Detailed installation guides on different platforms:
- How to install VPN Unlimited on macOS 10.14 and higher (Standalone Version)
- How to install VPN Unlimited on macOS 10.14 and higher (App Store version)
- How to install and get started with VPN Unlimited on iOS
- How to install VPN Unlimited Application on Android
- How to install VPN Unlimited application on Windows XP SP3
- How to install VPN Unlimited Application on Windows 7
- How to set up VPN Unlimited Application on Windows 8/8.1
- How to Install and Get Started with VPN Unlimited App on Windows 10
- How to install VPN Unlimited on Linux
How to create a new KeepSolid ID
- After installing the VPN Unlimited app, you will see the line "Create KeepSolid ID", сlick on it to start the process.
- Enter your email address in the designated field.
- Create a password and enter it in the password field.
- Repeat your password in the provided field to confirm it.
- Check the box next to the statement "By continuing, you agree to our…".
- Tap the "Sign up" button to complete the registration.
Connecting to a VPN server for the first time, you will be requested to allow adding VPN configurations and downloading a VPN profile. For more details, please refer to the manuals provided above on how to install VPN Unlimited on different platforms.
Important! Please note that you will need to configure your device using the generated settings by yourself at your own risk.
I. Create VPN Configuration for WireGuard
Before you can set up WireGuard® on your MikroTik router, you need to generate VPN configuration in your KeepSolid User Office.
To do that, follow a few simple steps described in the tutorial How to manually create VPN configurations.
II. Accessing MikroTik Web Console or WinBox:
- Web Console: Open a web browser and enter 192.168.88.1 in the address bar. Log in with your router's username and password.
- WinBox: Download and open the WinBox tool from the MikroTik website. Connect using your router's IP, username, and password.
III. Prepare WireGuard Configuration:
- Open the .conf file provided by VPN Unlimited with a text editor (like Notepad or TextEdit). Keep it open for reference as you'll need to copy values from this file.
IV. Create WireGuard Interface:
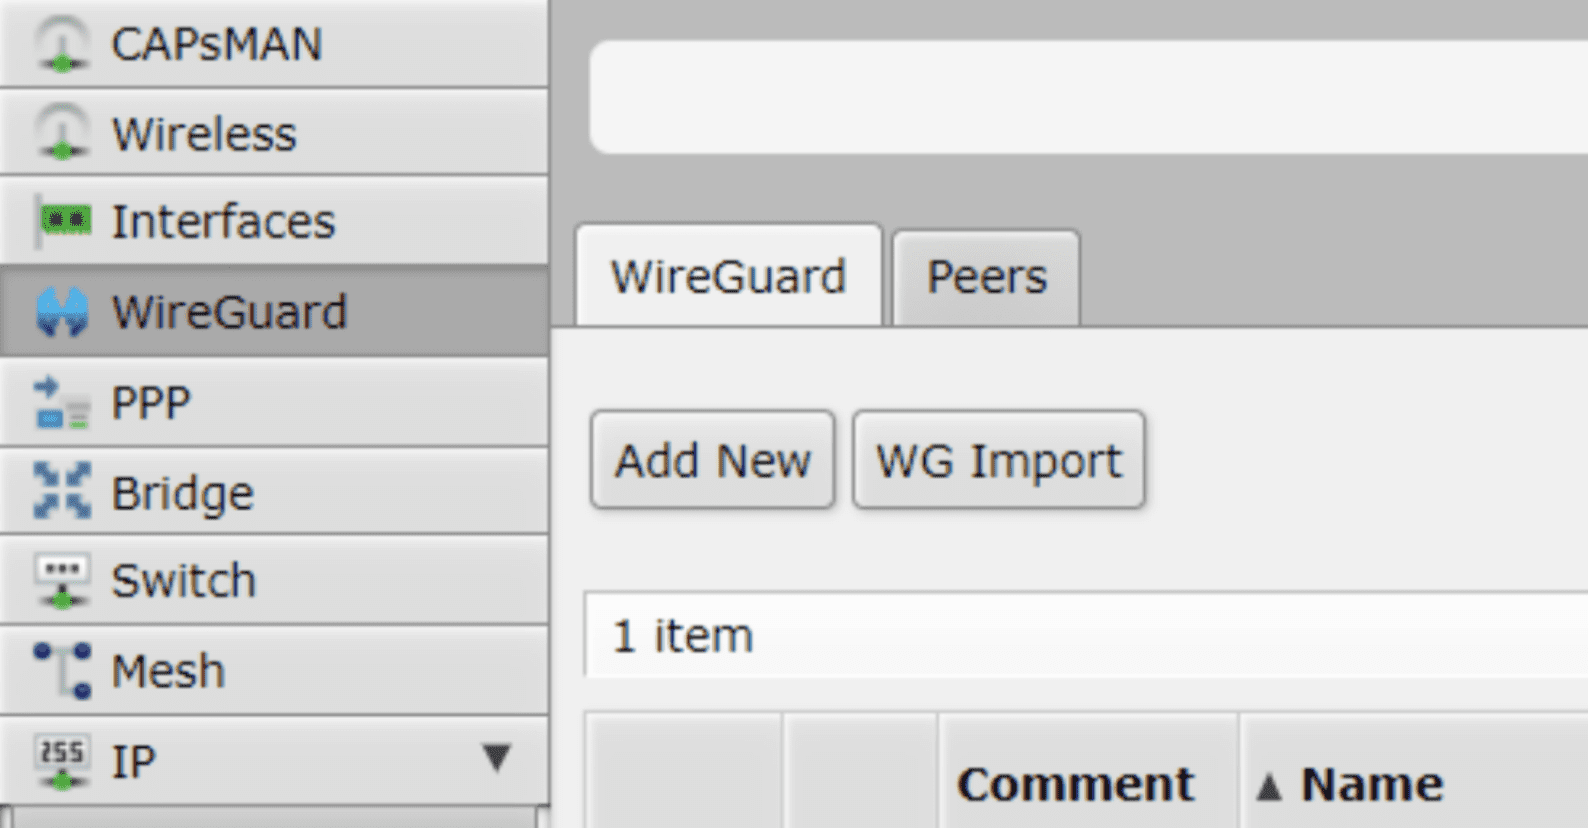
- In the router's menu, navigate to WireGuard > WireGuard and click on “Add New”.
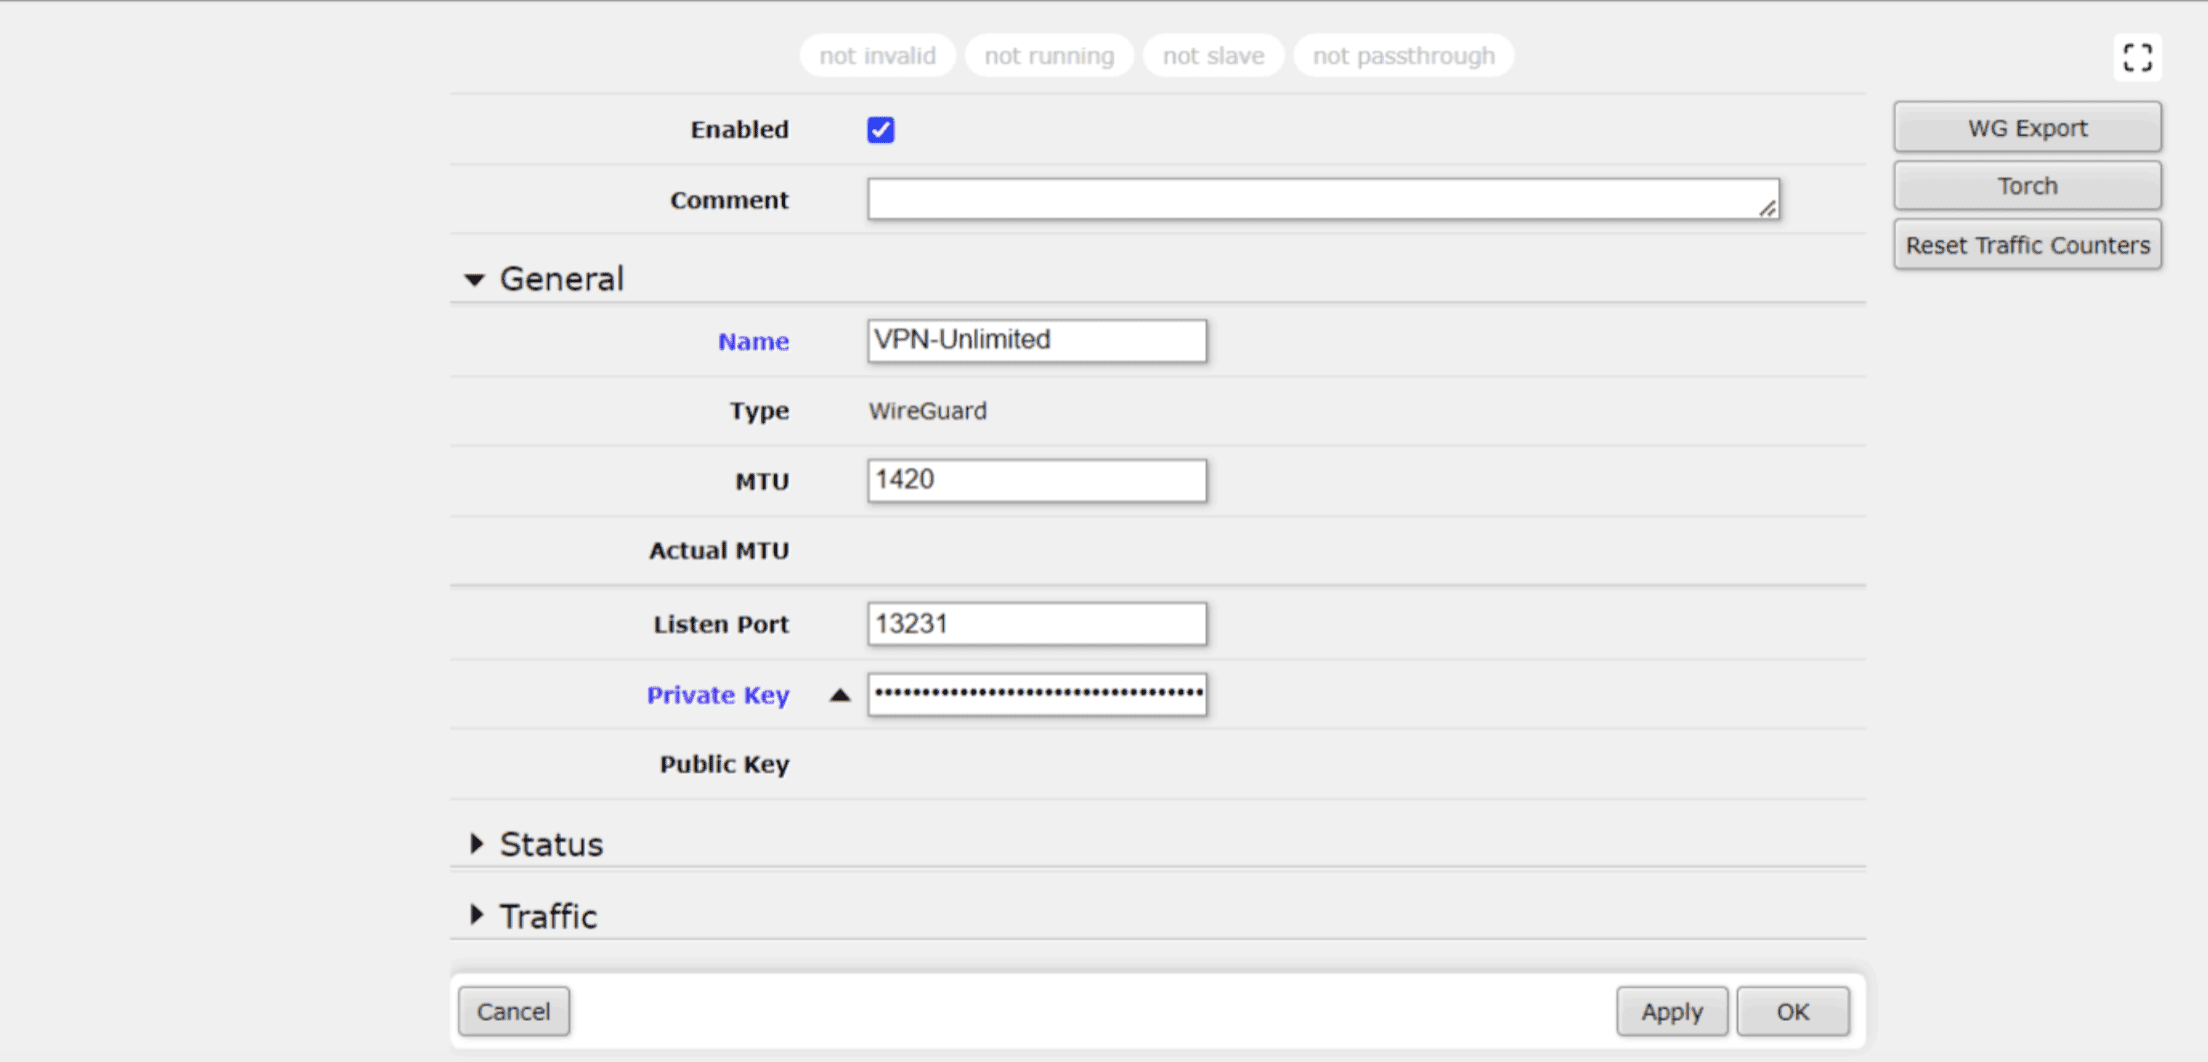
2. Set the Name as VPN-Unlimited.
3. For Private Key, copy and paste the key from the Interface section of your .conf file.
V. Configure IP Address:
- Go to IP > Address.
- Click “Add New” and enter the IP address and network. Use the address from the .conf file's Interface section. For the network, modify the last octet of your IP address to zero, making it X.X.X.0.

VI. Add WireGuard Peer:
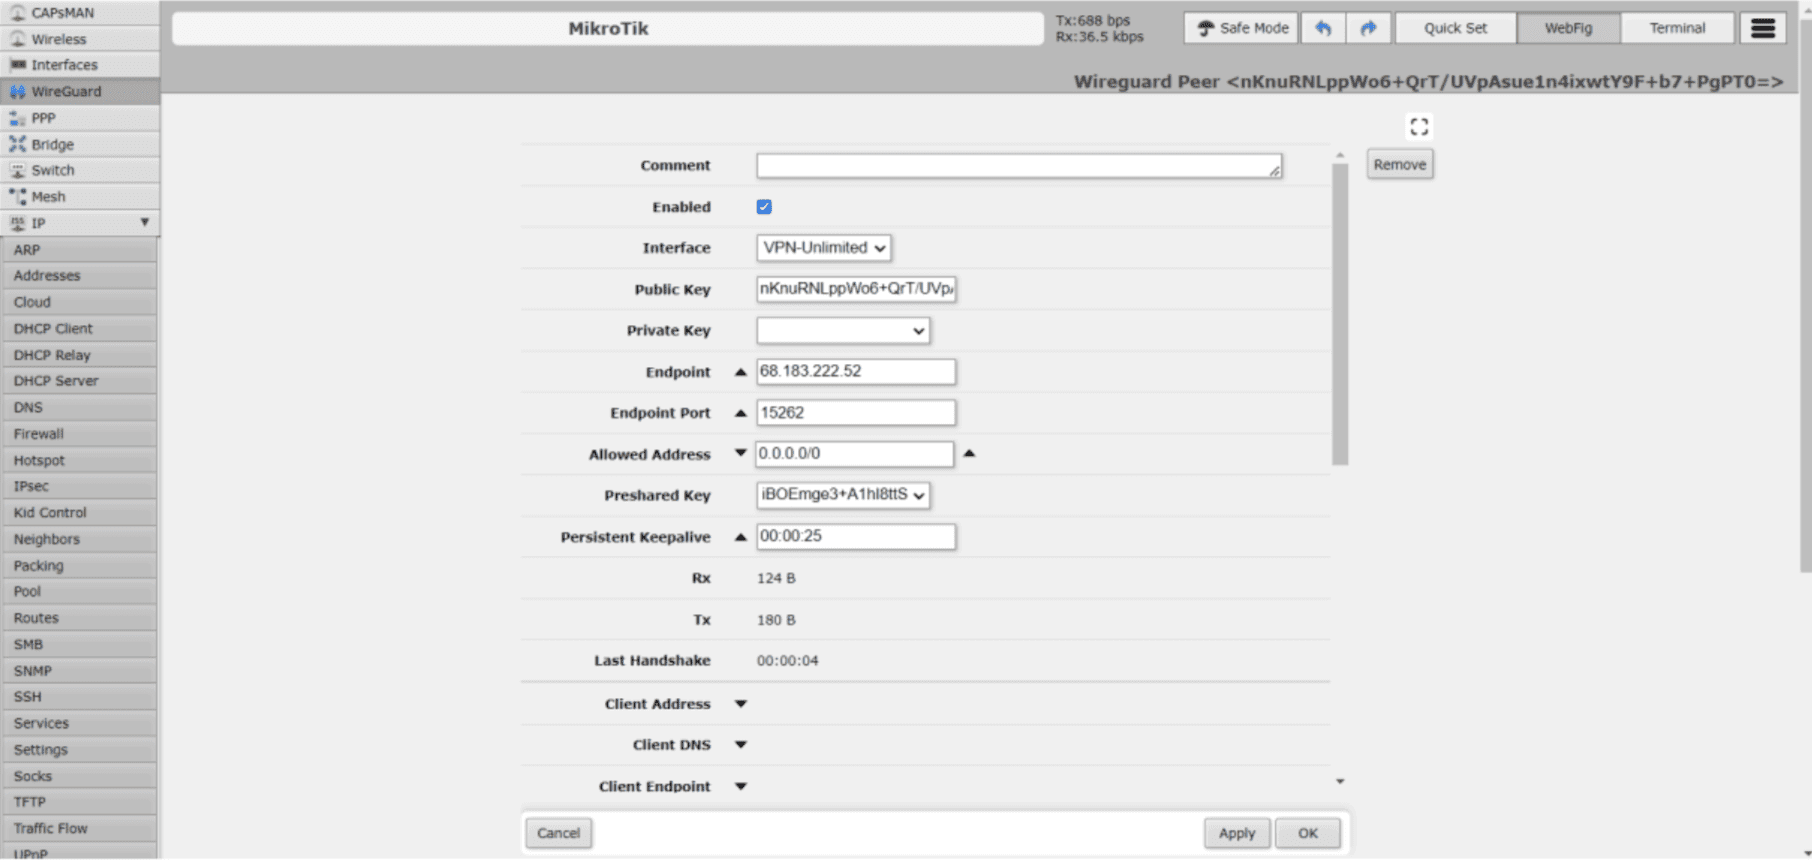
- Click the WireGuard > Peers tab. Click "Add New", add the parameters from the .conf file and click Apply > OK.
VII. Configure Routes for WireGuard Endpoint:
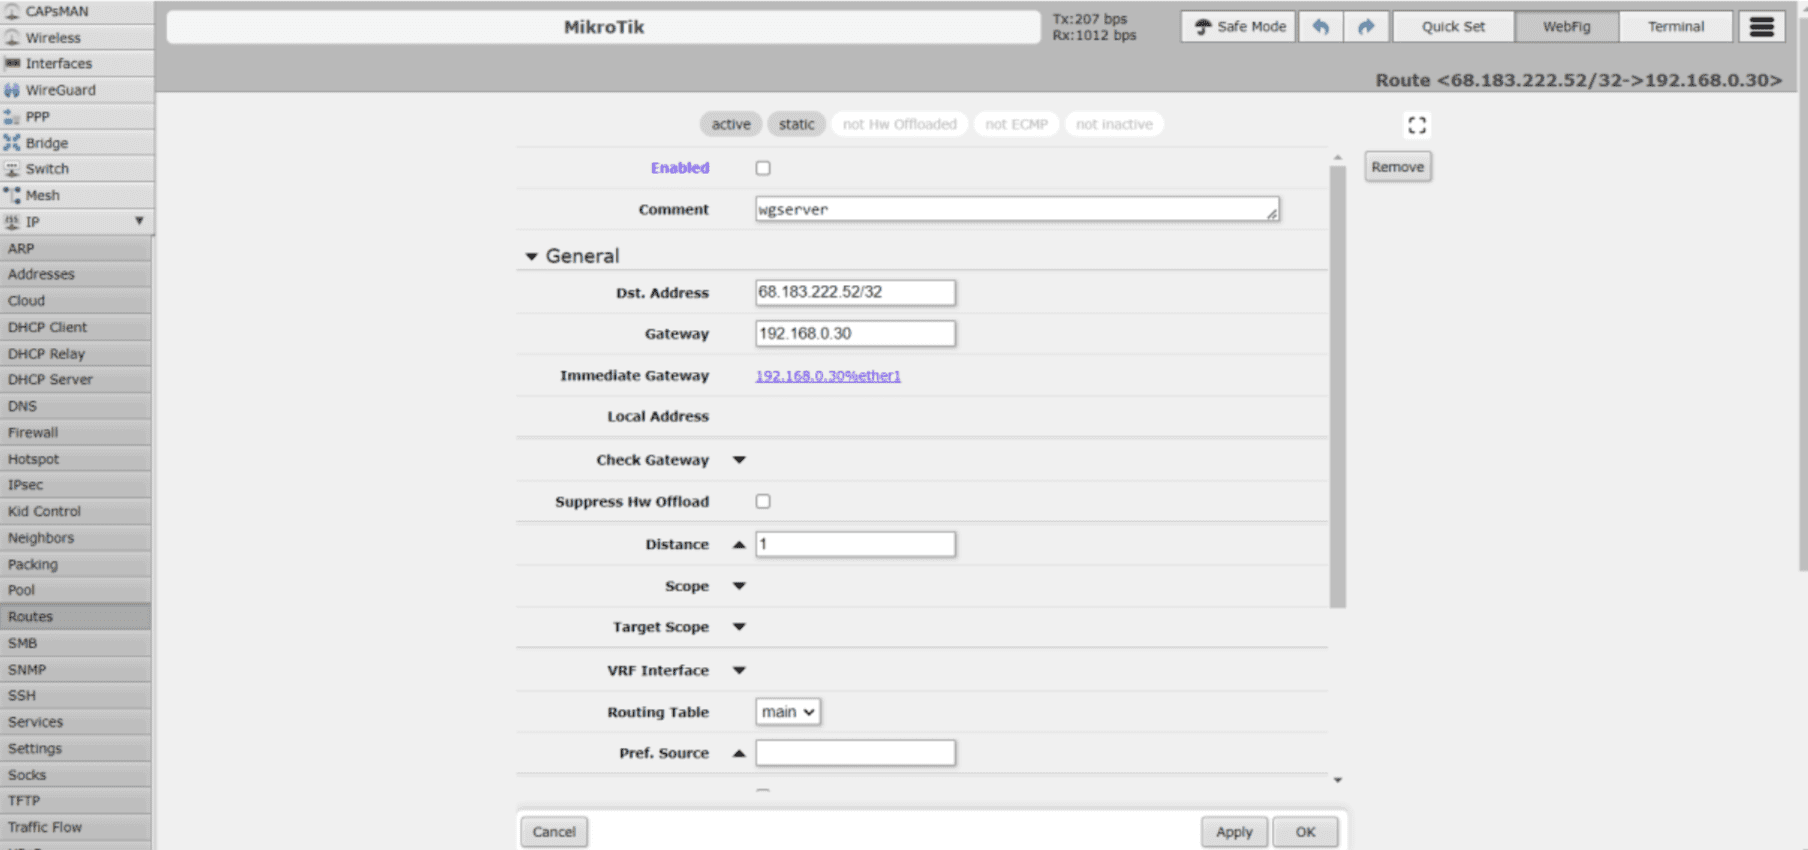
- Go to IP > Routes and click “Add New”.
- For Dst. Address, use the Endpoint address from your .conf file, adding a /32 mask.
- Set Gateway to your default gateway, which you can find under IP > DHCP Client.
- Add a comment like wgserver and mark the route as NOT Enabled.
VIII. Configure Default Route for VPN Traffic:
- Again in IP > Routes, click “Add New”.
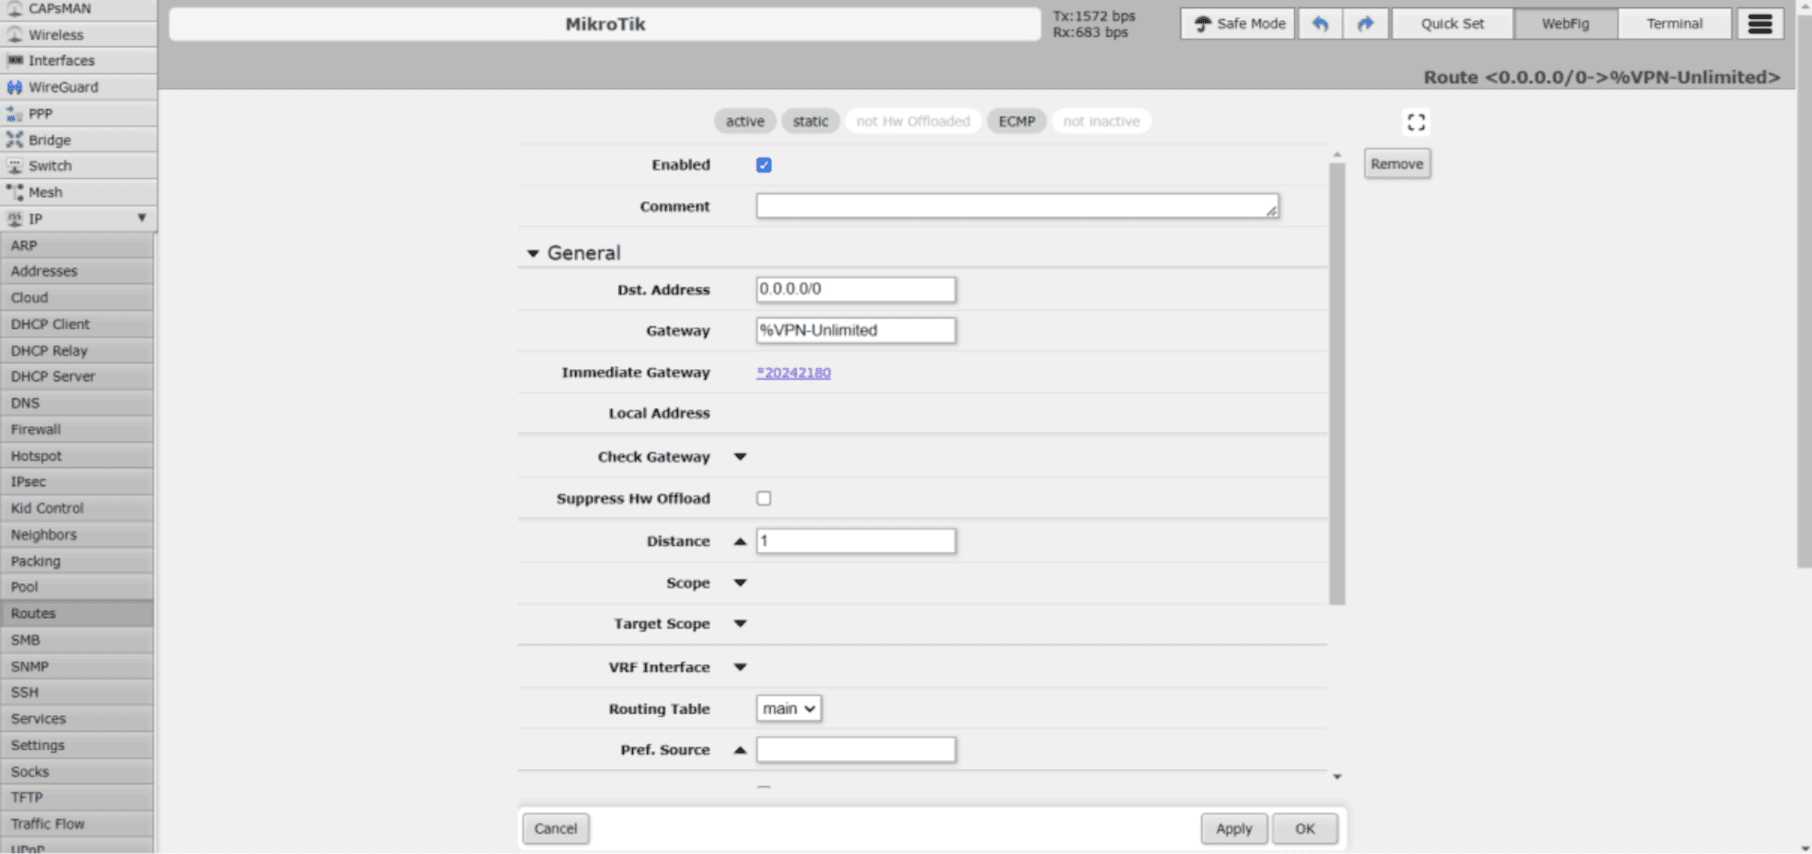
- Set Dst. Address to 0.0.0.0/0 and Gateway to %VPN-Unlimited.
- Mark this route as Enabled.
Note: Your internet might stop working at this point until the VPN is fully configured.
IX. Configure a DHCP Client for WireGuard:
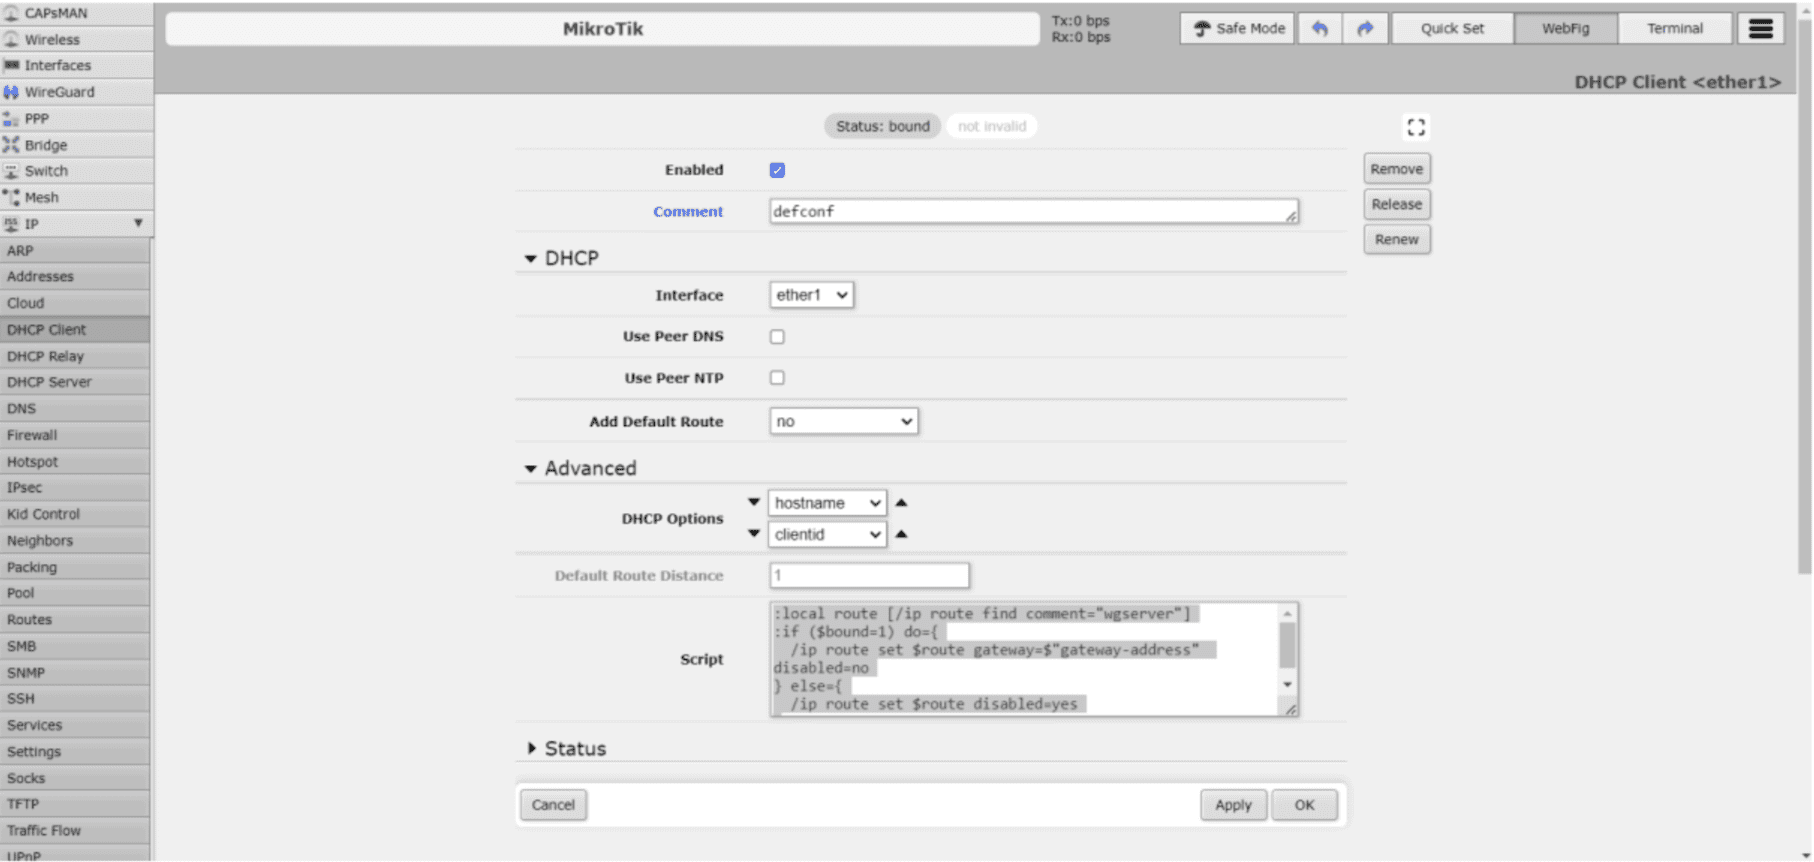
- Navigate to IP > DHCP Client.
- Edit your DHCP client configuration to include the provided script in the settings.
Script:
:local route [/ip route find comment="wgserver"]

:if ($bound=1) do={

/ip route set $route gateway=$"gateway-address" disabled=no

} else={

/ip route set $route disabled=yes

}
3. This script helps manage the VPN connection's route based on its status.
X. Create Interface List for VPN:
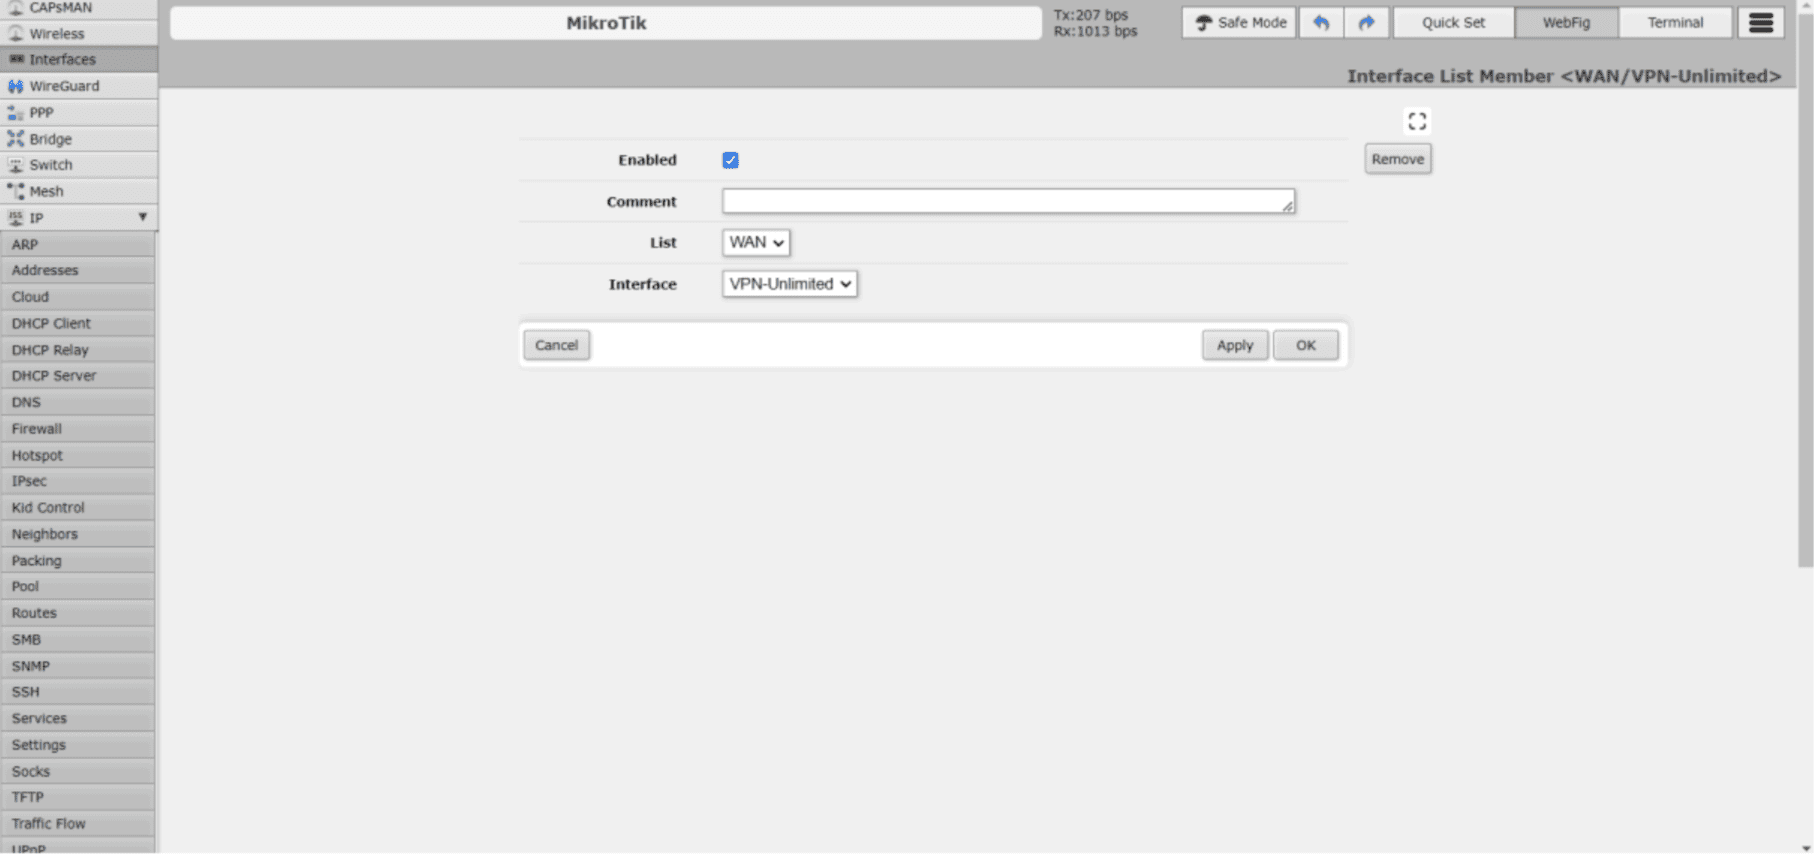
- Go to Interfaces > Interface List and click “Add New”.
- Select list as WAN and Interface as VPN-Unlimited.
XI. Set Up DNS:
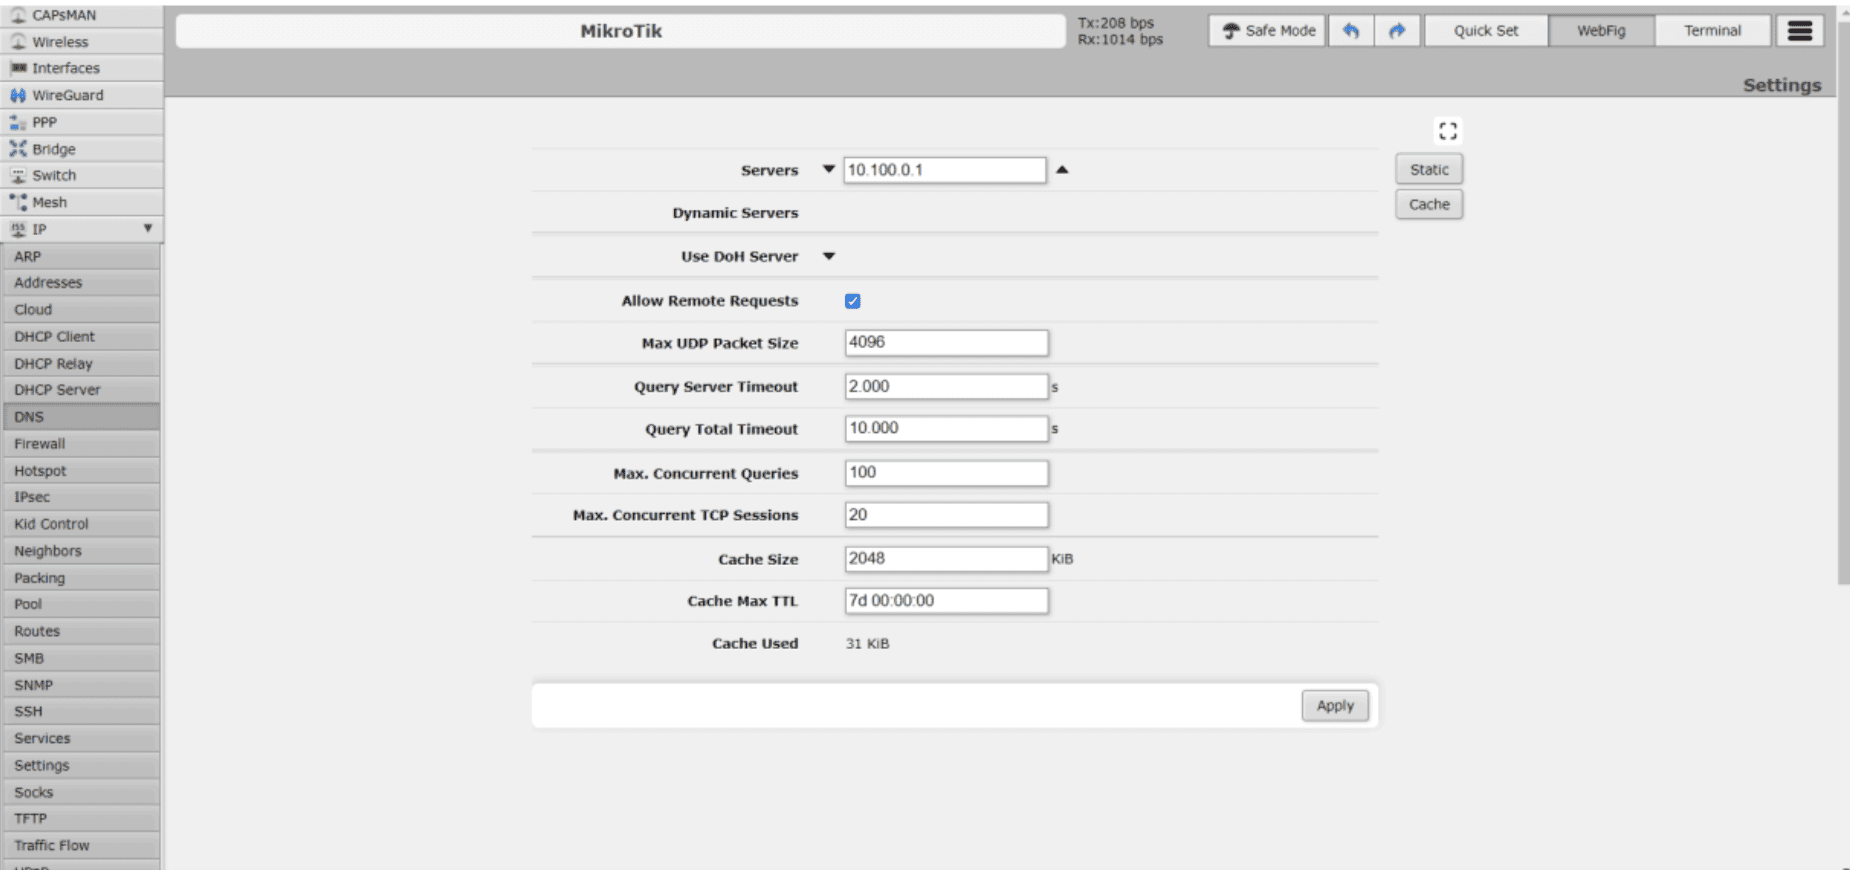
- Navigate to IP > DNS.
- Enter the DNS servers provided in your .conf file's Interface section.
- Check “Allow Remote Requests” to enable DNS resolution through the VPN.
That's it! You've successfully configured WireGuard VPN on your MikroTik router. Now, you can enjoy the benefits of the VPN Unlimited service along with the speed and security of the WireGuard protocol.
If you need any assistance, please feel free to contact our customer support via [email protected].
Try VPN Unlimited right now!
Streamline your web experience, protect your sensitive data, and defend against online threats and hackers.